Setting Debian 9 static IP is not too different from the previous version. You might find the network cards named a bit differently now. Apart from that, it is mostly the same. And we will look at an alternative at the end, and an issue while configuring Debian 9 static IP.
Debian 9 Static IP
Edit network interfaces
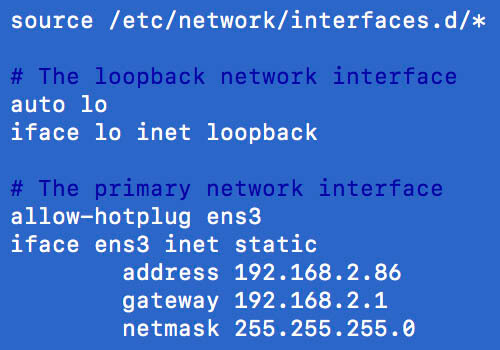
Let’s look at how to give your Debian 9 a static IP address. The first thing you need is to edit the network interfaces. Launch your favorite text editor and edit /etc/network/interfaces. It will look something like below. In this example, I’m using a wired network interface. It will now be called ens3 instead of eth0 like in earlier versions. Your interface might have a different name.
You need to change DHCP to static. Then you need to add the address, gateway, and netmask. In this example, I used 192.168.2.86 for address and 1921.68.2.1 for the gateway (because that is the address of my gateway). Most likely your settings will be different. Change them to fit your network. After editing the network interfaces my config looks like this after setting Debian 9 static IP.
Apply the Debian 9 static IP
To apply the changes we need to restart the network service. If you are connected to the computer via SSH, you will need to reboot. You will lose connection when restarting the network service if you are on SSH. If you are local or a KVM console restart your interface like below.
To restart the network service just type into the terminal or console: service networking restart (typing /etc/init.d/networking restart will also do). If you at this point check your network settings with ifconfig or ip addr, the network will be unreachable. To fix this run: ifup ens3 (or whatever your interface is called). Now run: ip addr, to verify your new settings.
Here I noticed my new static IP had become a secondary IP. I don’t want that. I only need 1 IP for this machine. At this point, I can use both 192.168.2.86 and 192.168.2.59 (which was the IP given by the DHCP server). I just rebooted to remove the DHCP assigned IP address.
Another option to static IP addresses
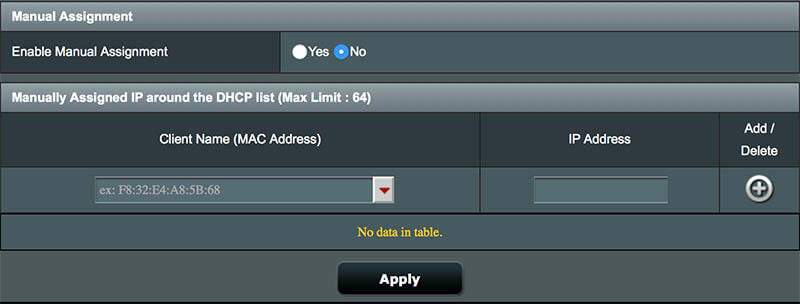
There is another option to a static IP address. Your router, if it is not too old and simple, has an option to assign IP addresses to specific mac addresses. On my wifi router, also used as a DHCP server it looks like this.
This is an inexpensive Asus RT-N66U router. But most wifi routers have this option to assign mac addresses to IP addresses. I prefer using Debian 9 static IP addresses instead of assigning them to the router.
If you are using Debian 8 (Jessie) or Debian 7(Wheezy), check out Debian Static IP how to
Check out this video to see how it is done
Or maybe looking for Debian 9 change hostname permanently






This Post Has 2 Comments