![]() Here is how to connect to a Debian based server using RSA certificate with Putty. First thing you need is to download Puttygen, and you will find that on putty’s offical download page here.
Here is how to connect to a Debian based server using RSA certificate with Putty. First thing you need is to download Puttygen, and you will find that on putty’s offical download page here.
Puttygen
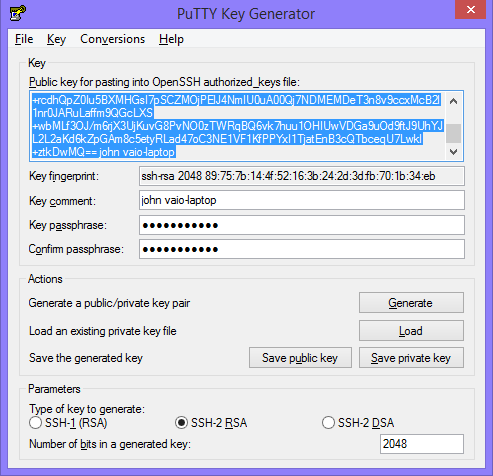
Start puttygen.exe and click generate. Now you need to move the mouse pointer around at the empty area at the top of puttygen. This is to generate random information for you RSA key. After the progress bar is full, you RSA certificate (both public and private) is generated.
Enter a not easy to guess password in the passphrase field. It will work fine without a passphrase, but it is for your extra security. It is not needed when you log into your server. It may also be a good idea to change key comment to something useful. Like example john-laptop, if your name is john and this is on your laptop.
Click Save public key. And save it somewhere on your computer.
Then click Save private key. This should be saved somewhere where only you can access it.
Server
Log on to your Debian server like you normally do, and make sure you are in your home folder. Then we need first to create a place for our ssh keys.
mkdir .ssh
chmod 700 .ssh
cd .ssh
vim authorized_keys
Now you need to paste your key information from puttygen into authorized_keys. Here is an example of the key. Make sure it starts with ssh-rsa
ssh-rsa AAAAB3NzaC1yc2EAAAABJQAAAQEAocbZcf1/YVDYLVdAZBR62SYsurkRbEAQSgBHhxkFjEf/omW+IkO2BEhEYcdjRDNCSWguIiGMi1pkIjoNwNg5aEimuDIQpy+FX6D1lAiiTFhUEGgBcR7XLxNY+rcdhQpZ0Iu5BXMHGsI7pSCZMOjPElJ4NmIU0uA00Qj7NDMEMDeT3n8v9ccxMcB2l1nr0JARuLaffm9QGcLXS+wbMLf3OJ/m6rjX3UjKuvG8PvNO0zTWRqBQ6vk7huu1OHIUwVDGa9uOd9ftJ9UhYJL2L2aKd6kZpGAm8c5etyRLad47oC3NE1VF1KfPPYxI1TjatEnB3cQTbceqU7Lwkl+ztkDwMQ== john vaio-laptop
That’s it for the server part, now we need to configure Putty.
Putty
To make it work with Putty, we need to save a Putty session. So start with entering the ip or domain address for your server into the host field.
Port will normally be 22.
In the category menu at the left side, click on Data under Connections. If you don’t want to type in your user name every time you connect, type in your username into auto-login username.
Expand the SSH menu, and select auth. Click on Browse, and locate your Private key.
Click Save.
Click on Session at the top of the category list at the left. And chose a name for your session in the Saved Session field. And then click Save. Do not click connect before clicking save, or you will have to config your putty again.
Now from your saved session list, you should be able to logon to your system without typing your username and password.
Happy sshing!